Adapted from a TOPS Terra Bagga activity by Dave Mastie (Ann Arbor, MI)
Type of Lesson: Model/Hands-on Activity/Discussion
Time Needed: 45 minutes (with extensions, could take 1-2 class periods)
Earth and Space Science, Grades 5-8: The earth is the third planet from the sun in a system that includes the moon, the sun, eight other planets and their moons, and smaller objects, such as asteroids and comets. The sun, an average star, is the central and largest body in the solar system.
Earth and Space Science, Grades 9-12: Movement of matter between reservoirs is driven by the earth’s internal energy and external sources of energy…
Science and Technology, Grades K-4: Tools help scientists make better observations, measurements, and equipment for investigations. The help scientists see, measure, and do things that they could not otherwise see, measure and do.
Physical Science, Grades K-4: Magnets attract and repel each other and certain kinds of other materials.
Unifying Concepts and Processes, Grades K-12: Models are tentative schemes or structures that correspond to real objects, events, or classes of events and that have explanatory power.
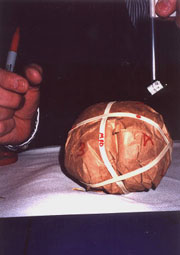
2. The next step is to turn the paper bag inside out! This is to create a clean surface that will be labeled later on. Work the bag by crumpling it and folding it.
3. When the bag is turned inside out and is pretty workable, place your battery (with the magnets taped on) inside the paper bag. It does not matter which way the battery is facing. Work the paper bag around the battery to create a nice smooth (fairly round) world.
4. Now it's time to put the rubber band markers on your world. The first rubber band can just be placed wherever it's most needed to hold your world together. Just stretch the rubber band around your world.
5. Now stretch one more rubber band across your world. This rubber band should meet at right angles with the first rubber band so that your world is now split into 4 equal segments. Pick one of the intersections of your two rubber bands to be the geographic north pole. Make sure the north pole is facing up.
6. Now it's time to label parts of your world. Note that the rubber bands make a "t" when looking down on the north pole. The right arm of the "t" is the prime meridian. Label the rubber band with a 0 because the prime meridian is at 0 degrees longitude. You have just created your world's first longitude line! Now on the left arm of the "t", write a 180 on the rubber band. This is the international dateline or 180 degrees longitude. Now, one of your rubber bands is done being labeled.
7. Now turn your world so that you are looking at the prime meridian. Everything east (right) of the prime meridian all the way to the international dateline is the eastern hemisphere. Everything west (left) of the prime meridian all the way to the international dateline is the western hemisphere. Label the part of your (unlabelled) rubber band that lies in the eastern hemisphere 90 E, because it represents the longitude of 90 degrees east. Label the part of that same rubber band that lies in the western hemisphere, 90 W, because it represents the longitude of 90 degrees west.
8. It is time to add the third rubber band to your world. This rubber band should stretch across both of the other rubber bands meeting those rubber bands again at right angles. This rubber band is your world's equator, so it should be stretching across the middle of your world. Once that rubber band is in place, label that rubber band equator. Everything above equator towards the geographic north pole is the northern hemisphere and everything to the south of the equator is the southern hemisphere. Your world should now have 8 equal segments.
9. It's time to label the 8 segments. The segments in the northern hemisphere should be labeled 1-4 with segment 1 being between 0 and 90 E. Segment 2 is then between 90 E and 180, segment 3 is between 180 and 90 W and segment 4 should end up being between 90 W and 0. The segments in the southern hemisphere should be labeled 5-8 with segment 5 being below segment 1 and so on so that segment 8 is below segment 4.
10. On a piece of paper, write down your group members' names. Label the top line of your piece of paper World Information Sheet. Now, name the world you've created. Make sure to write that name on your world somewhere (at the geographic south pole of your world would be good). Write down the name of your world on your piece of paper. With your magnetometer, test to see where the magnetic north pole of your world is. The magnetometer end labeled north should dramatically point in where the magnetic north pole of your world is. On the piece of paper, write magnetic north pole = segment number where the magnetic north pole is. Find the magnetic south pole of your world. On the piece of paper, write magnetic south pole = segment where the magnetic south pole is. Turn your piece of paper into your teacher.
The dead D-size batteries in this lesson are used for their steel casing. Most recycling centers that have battery recycling will gladly let you take a bagful of dead D batteries home with you for free. The battery with the donut magnets taped on create the "bar magnet" found in the core of many of the planets and moons. The donut magnets used for this activity can be found at Radio Shack stores across the nation. These magnets have a definite north and south pole - with the top face of the magnet being one polarity and the bottom face of the magnet being the opposite polarity.
A simple assessment exercise can be done when all of the groups have created their worlds and have found where the north and south magnetic poles of their worlds are. After students have brought you their sheets of paper with their world's information on it, tell the students to place their worlds on their lab tables or desks. Now, have students go around to each world and use their magnetometer to find the magnetic north and south pole of each world. Have them complete the following worksheet to turn into you. The answer key should be the World Information Sheets they previously turned into you!
This activity brings up many interesting points of discussion. You may choose to discuss with your students lines of longitude and lines of latitude. You may choose to discuss why geographic and magnetic poles don't always line up. Or you may choose to discuss what a magnetic field around a planet or moon tells us (magnetic fields point to convection of molten material in a body's interior and this in turn could mean the body has tectonic activity or volcanic activity). It is at least important for the students to know that most planetary space missions carry magnetometer instruments. The magnetometer instrument the students built and used is just a simplification of the magnetometer instruments that get launched into space onboard spacecraft headed to Mars, Jupiter and beyond!
Other uses of the magnetometer instrument can be explored using our Magnetometer Extensions activity.